Thursday, 21 April 2016

Travel Tip 6 - Pack-A-Snack

It's all very well that most long haul flights give you in-flight meals and drinks however when you have left home hours before your flight and the option to buy overpriced food and drink at the airport doesn't float your boat or should I say fly your plane then it is always good to have a little something packed in your hand luggage.

I keep my eyes open for little bottles of water or fruit juice under the 100ml limit so that they don't get confiscated or in worse case scenarios I will buy a bottle of water once through security.  The other alternative is to take an empty bottle with you and fill up once you get through security.  In the States you find water fountains around to fill up your bottle however most places will give you tap-water for free. (I don't actually drink tap water anywhere leaving me the option to bring the small bottles or buy in the departure lounge!)

As your metabolism reacts differently to digesting food at altitude than on the ground I try to eat simple and easy to digest food for breakfast like fruit and yogurt or maybe an omelette for lunch or supper knowing that you will get fed about an hour and a half into your flight.

Meal tip: pre-ordering the vegetarian option means you will be guaranteed to get an easier to digest meal (kind of the lesser of the evils really).

So to keep hunger at bay when travelling I like to have a few snacks in my hand luggage (carry-on in the USA) like:


Small packs of Ritz crackers or Pringles crisps,
Mixed nuts and raisins or mini flapjacks,
Mini Cheddars,

Dried fruit or fruit wraps along with a bar of your favourite bean to bar chocolate,
The list is really endless of what you could take. Another one I like is:

I also like to take my own green tea bags or red bush tea bags even though I am a devoted coffee drinker. Caffeine, red meat and alcohol are the things I try to avoid when long haul flying - over the years I found I felt better when I did that.

So happy and comfortable travels.  Leave a comment below what snacks you like to pack.


Saturday, 16 April 2016

Cardiff: A Day of Blue Skies

My first time visiting the city of Cardiff in South Wales was for a recent travel blogger conference weekend.  The weather was chilly and typical for Spring but dry (which was a gift!) and the skies were absolutely the most beautiful blue splattered with the occasional thin cloud.

Here are a few of my photos taken during our visit.
Cardiff City Football Stadium
Early morning Cardiff Castle
Afternoon and the clouds are starting to gather
With the rugby stadium in the background. The red brick building to the right was once a bonded warehouse when the ships could sail right up to that point!
Cardiff City Hall
Cardiff City Hall
Relief of statues - Cardiff City Hall
Cardiff City Museum
 Principality Rugby Stadium aka Cardiff Arms Park
We really appreciated the sun shine and blue skies even though we were unaware the following day it would pour with rain!

Thursday, 14 April 2016

Cardiff: A City of Arcades

When you think of seaside places in the UK and the word arcades is mentioned you probably think of all the places you go to use up all the pennies you have saved during the year.  I know that was my first thought when I heard that Cardiff was a city of arcades.
However the reality is that Cardiff has loads of little passage ways called arcades that are full of little shops and coffee stops.  There is a little shop to look in and find just about anything you are looking to buy. For example:-
Have breakfast
Or a relaxing cup of coffee
Get a tattoo
Have your hair done
Get your lunch at a deli (liquid or food)
Stop for a reviving cup of coffee and something sweet - a Millionaires Shortbread or perhaps a Welshcake
Need a button - there is a shop just selling buttons.
Along just about every street in the city centre is an arcade or two. Passing through each one and coming out on another busy and bustling street with the entrance to another arcade just ahead.

You can spend many glorious hours wandering through all the arcades and passageways, picking up many bargains along the way. It's a small city but there is loads to see - I hope to go back again soon to continue my discoveries!


Travel Tip 5 - Coconut Oil

I have mentioned before how versatile coconut oil is and I wanted to devote a whole post to telling you how I use it in my daily routine.

I only buy good quality, organic coconut oil from a reputable supplier, usually VitaCoco especially as it is for consumption.

Coconut oil is solid in its container but with a little warmth soon becomes liquid.  I use it to stir-fry vegetables.  You don't get a strong coconut taste.  It can take a higher heat and is loaded with anti-oxidants.  In a stir-fry just pop a spoon full into your frying pan and it will soon melt as the pan heats up.
For use in cakes you just heat briefly in the microwave and measure and use as you would any oil.

To keep my dog's coat shiny and help his joints I warm up a teaspoon and pour it on his food. He loves the taste and this encourages him to eat as otherwise he can be a fussy eater!

However this is a predominately travel series and this is where I really love and use coconut oil the most. 
I found out a few years ago that I am allergic to conventional deodorants and was told coconut oil made a great deodorant.  I have been using it for a couple of years and couldn't go back now.  I put some in my hands and warm it up before just spreading it lightly under my arm pits.  To stop any tacky feeling I then dust with baby powder or un-perfumed talc and away I go.  There is no sticky residue and a shower leaves you clean and ready to start the day again.
My fitbit causes me to occasionally get some eczema on my wrist so at night I just massage some coconut oil into the affected area and in the morning the skin has had a chance to heal and ready to put the fitbit back on.

I had a red itchy patch on my leg for ages and often gave in and used a cortisone cream but when I stopped using that the redness and itchiness would come back. Since I have been using coconut oil (again using the warmth of my hands to melt the solid oil) that patch of irritation has gone away and stays away for quite a long time.

For a face cream - day cream I put a small amount between my hands, let it warm up and massage into my face paying attention to my neck and jaw area. 
Be careful not to get any in your eyes though.  I couldn't use this if you smelled like a coconut all day however as soon as the oil is massaged into the skin there is no discernible coconut smell residue.

I have a separate jar of coconut oil in the bedroom and one in the kitchen to avoid cross contamination. I also have a small plastic jar of coconut oil in my handbag to use as a lip balm or if I get any dry patches during the day.

Coconut oil offers some SPF protection although I still use a recognised sun protection lotion with a quite high SPF (Sun Protection Factor) if I am in the sun for a prolonged time or on holiday.

Although I have known about coconut oil and its benefits for a very long time and it took me a while to get on board with it I really couldn't imagine my daily beauty routine without it.  PS it is also a lot less expensive than many of the recognised face and body lotions, most of which contain alcohol which helps to dry out your skin, making you need more product and so the circle continues.

You can get coconut oil in most supermarkets and health food stores in the UK and the USA and I always look for Organic on the label too. 

Hope you try it and get on with it. Let me know in the comments below what you think about the coconut oil craze!


Wednesday, 13 April 2016

London: Quorn cooking at The Kids Cookery School

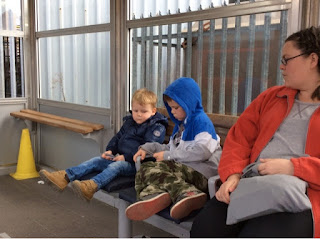
I was invited to attend a children's cookery school at The Kid's Cookery School with my two grandsons in the Easter school holiday. The boys endured a long train ride to West London venue and were really well behaved and quite excited.
Both boys went off to make pizzas and buns for their Quorn burgers while their mum and I had a session with Alison a Home Economist from Quorn research and test kitchen who gave us a really great insight into Quorn.

We were shown a short video of the production and Alison had a bag of the product as it is made.  What they turn it into really is full of imagination (and may I add taste and texture).

I have used Quorn frozen mince before but have never bought the ready made products from the chilled food sections and I was really impressed at the range.  Click here for my Quorn Spaghetti Bolognaise recipe.

I don't buy Quorn or other meat substitutes in the hopes that they will taste just like the product they are replacing.  We are not by any means vegetarians in our household however I do try to keep meat to a minimum and we tend to have 2-3 meat-free days per week.

We tried the Quorn 'chicken' fillets which had been marinated in a sort of tandoori marinade and they were actually delicious. I would make these at home, not to replace meat but to add to a salad or buffet as something delicious and healthy to eat.
The boys (Big & Small) went off with the instructors and immersed themselves into pizza dough making followed by decorating and topping their pizzas which were subsequently cooked and wrapped for them to take home. 
Their second session was making the bread rolls for their 'chicken' and 'beef' burgers also wrapped ready for them to take home. 
They both had a great time and chatted to us non-stop on the way home about their cooking school and Chef John!

Once home they wanted to eat their pizzas for supper.
Apart from the children having a great time and also learning a bit about healthy cooking and eating I was very interested to learn how sustainable Quorn is and how high in protein it is. 

A few Quorn facts for you:-
* Quorn is a mycoprotein created by Lord Arthur Rank (Rank Hovis McDougall) in the 1960s
* Originally created as a substitute to the dwindling world meat supplies it is now marketed as a range of versatile meat-free products suitable for all vegetarians.
* Quorn is a healthy protein with a low environmental impact much lower than that needed to bring beef or chicken to the dinner table.

If you want to know more about the sustainability of Quorn click here.

Quorn is a funny word but is actually named after the little Yorkshire village where the concept was started!
Do you use Quorn? What is your favourite recipe that you make with it? Do you have any meat-free days each week?

I was a guest of Quorn with my daughter and grandsons.  We were not required to write a positive review and did not receive payment for attending.  All opinions are my own and photographs are my own.


Thursday, 7 April 2016

Simply Beef and Lamb - #LivePeasant - Slow Cooked Beef with Gnocchi

Simply Beef and Lamb are promoting their campaign #LivePeasant encouraging people to cook simple, tasty and nutritious meals for their families. Their recipes can be done in a slow cooker or cooked slowly on the hob or in the oven on a low temperature.

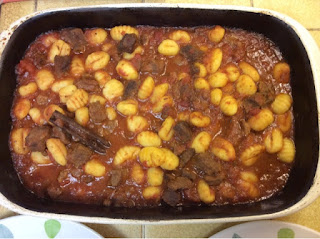
Slow cooked stews and casseroles are comfort family food, perfect for any time of the year but essentially perfect for these days of Spring when you want to start spending a little more time outside and as the wind turns to chilly come inside to a lovely warming supper. Here is their recipe for:-

Slow cooked Beef with Gnocchi                                                                      Serves 4
Preparation time: 20 minutes
Cooking time: 2 - 2 1/2 hours
Ingredients:
450gm lean boneless shin or chuck steak, cut into 2.5cm cubes
Salt and freshly ground black pepper
2.5ml cayenne pepper (optional)
5ml paprika
30ml rapeseed oil
1 large onion, peeled and choopped
2 large garlic cloves, peeled and finely chopped
2 x 400gm cans of chopped tomatoes
200ml good, hot vegetable stock
1 cinnamon stick, halved
15ml sugar
15ml tomato puree
1 x 400gm pack fresh gnocchi
30ml freshly chopped parsley to garnish

Method:
1. Place the beef in a large plastic zip lock food bag.
Add the salt&pepper, cayenne pepper and paprika; seal, shake well to coat the beef in the spices.
2. Heat the oil in a large non-stick frying pan.

3. Cook the beef for 4-5 minutes in batches until brown on all sides. Transfer to a 1.7L heatproof casserole pot.
4. In the same frying pan, cook the onion and garlic for 2-3 minutes. Spoon into the casserole pot.
5. Add the tomatoes and stock as well as cinnamon, sugar and tomato puree. Bring this to the boil, add to the casserole pot, cover and cook on a low heat in the oven for 2-2.5 hours.
6. 10 minutes before the end of the cooking time add the gnocchi.
7. Garnish with the parsley and serve with crusty bread.

Tip: If you prefer substitute the gnocchi for freshly cooked pasta shapes.

This is a sponsored post. All photos and opinions are my own.